在docker中搭建pwn环境
听到舍友说他一直都是在docker中做pwn的,一想到docker和虚拟机相比确实没啥差别(除了没有图形化界面),而且搭建好之后在各个地方都可以使用。网上也有别人搭建好的环境:https://github.com/skysider/pwndocker
这里自己搭建了一遍,把整个过程记录了下来。
下载并启动ubuntu镜像
这里基于ubuntu16.04的镜像来搭建环境,首先下载该镜像:1
2
3
4$ docker pull ubuntu:16.04
16.04: Pulling from library/ubuntu
Digest: sha256:45ddfa61744947b0b8f7f20b8de70cbcdd441a6a0532f791fd4c09f5e491a8eb
Status: Image is up to date for ubuntu:16.04
因为我这里已经下载过了,所以显示的是上面这样。如果下载的慢的话可以使用加速器,我是用的是doucloud(当然可以选择其他的):
curl -sSL https://get.daocloud.io/daotools/set_mirror.sh | sh -s http://f1361db2.m.daocloud.io
接下来启动ubuntu镜像;
1 | $ docker run -i -t --name create_env ubuntu:16.04 bash |
现在相当于在ubuntu镜像的基础上启动了一个容器,也就是一台新的ubuntu虚拟机,现在可以在里面安装各种工具了。
安装环境
修改源
和正常的ubuntu一样,首先修改系统的源,这里使用的是清华的源:
https://mirror.tuna.tsinghua.edu.cn/help/ubuntu/

依次执行下面的命令:1
2
3
4
5
6
7
8
9
10
11
12
13
14cd /etc/apt
# 保存原始的sources.list文件
cp sources.list sources.list.bak
apt-get update
# 安装编辑文本的工具,可以用自己顺手的vim
apt-get install nano
# 更换源之后采用https协议,需要安装该软件才行
apt-get install apt-transport-https
# 覆盖原始的内容
echo '' > sources.list
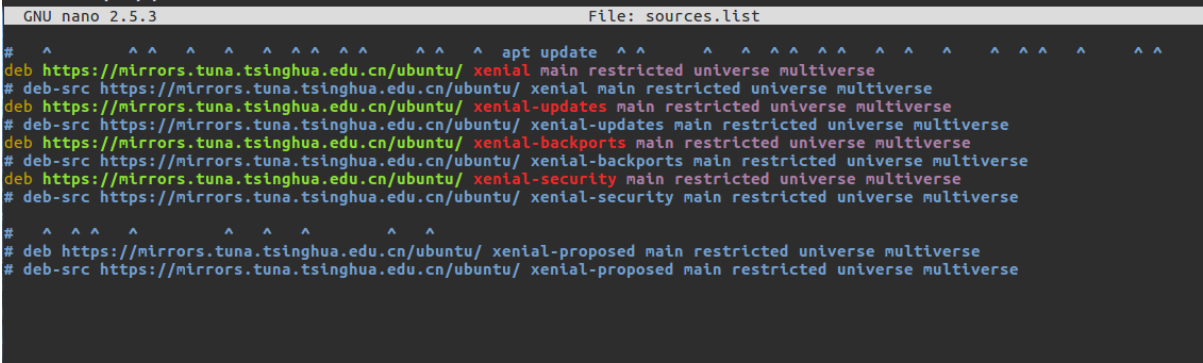
# 将清华的源拷贝进去(Ctrl+Shift+v)保存
nano sources.list
apt-get update
安装pwntools
依次执行:1
2
3apt-get install python2.7 python-pip python-dev git libssl-dev libffi-dev build-essential
pip install pwntools
更新pip(这个与安装pwntools无关):1
2
3
4
5
6
7
8root@5cfd7de2e9f7:/etc/apt# pip install --upgrade pip
Collecting pip
Downloading https://files.pythonhosted.org/packages/5f/25/e52d3f31441505a5f3af41213346e5b6c221c9e086a166f3703d2ddaf940/pip-18.0-py2.py3-none-any.whl (1.3MB)
100% |################################| 1.3MB 886kB/s
Installing collected packages: pip
Found existing installation: pip 8.1.1
Not uninstalling pip at /usr/lib/python2.7/dist-packages, outside environment /usr
Successfully installed pip-18.0
更新完了之后需要将/usr/bin目录下的pip编辑成如下所示:
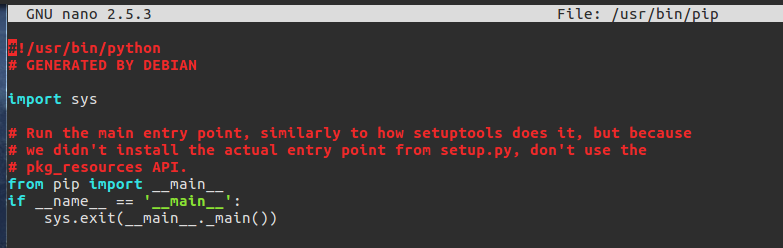
nano /usr/bin/pip保存即可。
安装pwndbg
参考链接:https://github.com/pwndbg/pwndbg
依次执行下列语句:1
2
3
4
5
6
7
8
9
10
11
12
13# 创建相应目录
root@5cfd7de2e9f7:/# cd /home
root@5cfd7de2e9f7:/home# mkdir em
root@5cfd7de2e9f7:/home# cd em
root@5cfd7de2e9f7:/home/em# mkdir software
root@5cfd7de2e9f7:/home/em# cd software/
root@5cfd7de2e9f7:/home/em/software#
# 安装
git clone https://github.com/pwndbg/pwndbg
cd pwndbg
apt-get install sudo
./setup.sh
安装ROPgadget、libc-database、one_gadget
- ROPgadget和libc-database按照官方的步骤即可:
ROPgadget:
https://github.com/JonathanSalwan/ROPgadget
libc-database:
https://github.com/niklasb/libc-database
- one_gadget:
依次执行下列语句即可:1
2
3apt-get install ruby
apt-get install gem
gem install one_gadget
安装tmux
使用bash进入到docker中后只有一个命令行终端,这样很不方便,可以在该容器中安装tmux,来同时开启多个终端。
使用apt-get install tmux来安装
启动鼠标切换界面:1
2
3root@5cfd7de2e9f7:~# touch .tmux.conf
root@5cfd7de2e9f7:~# nano .tmux.conf
root@5cfd7de2e9f7:~#

注意:在启用鼠标切换之后如果需要选中终端中的部分内容,需要在按住Shift的情况下才可以
除了上面提到的工具外,可以自行安装需要的工具
将容器打包成自己的镜像
经过上面的步骤,我们已经搭建好了需要的环境,下面就将这个容器打包成镜像:
- 首先退出该容器,然后查看已经停止运行的容器:
1
2
3$ docker ps -a
CONTAINER ID IMAGE COMMAND CREATED STATUS PORTS NAMES
5cfd7de2e9f7 ubuntu:16.04 "bash" About an hour ago Exited (0) 13 seconds ago create_env
得到容器的id为:5cfd7de2e9f7
使用commit命令提交该容器为镜像:
1
2
3
4
5
6
7
8
9
10
11
12
13
14# 可能需要一点时间
$ docker commit -m "pwn 16.04 v2" 5cfd7de2e9f7 e3pem/dockerpwn:v2
sha256:68136e03da7b3d544fd8ece63b6fbdcbd962948e9bcdc1a390d529cb89193ea9
# 其中`-m`为提交镜像时的描述
# 5cfd7de2e9f7 为容器的id
# e3pem/dockerpwn:v2 为镜像的标签,将e3pem换成自己在dockerhub上的用户名
# 查看构造出来的镜像
$ docker images
REPOSITORY TAG IMAGE ID CREATED SIZE
e3pem/dockerpwn v2 68136e03da7b 2 minutes ago 956MB
e3pem/dockerpwn v1 fa2334fe2cd8 20 hours ago 1.24GB
dockerpwn v1 fa2334fe2cd8 20 hours ago 1.24GB
ubuntu 16.04 b9e15a5d1e1a 3 weeks ago 115MB可以选择将镜像push到dockerhub:
docker push e3pem/dockerpwn:v2因为网速的问题,可以将得到的镜像上传到阿里云:参考链接:https://help.aliyun.com/document_detail/51810.html
常用的操作命令:
docker login registry.cn-hangzhou.aliyuncs.com
docker pull registry.cn-hangzhou.aliyuncs.com/acs/agent:0.8
docker push registry.cn-hangzhou.aliyuncs.com/acs/agent:0.8
使用构建的镜像
在分析题目的时候经常需要进行调试,在docker中调试是需要权限的,因此在第一次启动镜像的时候需要添加--privileged选项
同时可以将容器中的某一个目录和主机的目录建立映射,这样就能很方便的在宿主机和容器间共享文件了,使用-v选项来设置共享目录
例如这样的命令:
docker run -i -t --privileged -v /home/yourhost/path/ctf:/home/docker/path/ctf e3pem/dockerpwn:v2 bash
在容器停止运行后,下次要继续在该容器中运行,可以按如下方法:
先获取到容器的id:1
2
3$ docker ps -a
CONTAINER ID IMAGE COMMAND CREATED STATUS PORTS NAMES
6121daf720c0 e3pem/dockerpwn:v2 "bash" 15 seconds ago Exited (0) 6 seconds ago modest_nobel
获取到容器的id为:6121daf720c0
建立一个脚本,内容如下:1
2docker container start 6121daf720c0
docker exec -i -t 6121daf720c0 bash
以后就可以通过运行脚本来启动docker-pwn的环境了:1
2
3
4
5$ sudo chmod +x dockerpwn2.sh
$ ./dockerpwn2.sh
6121daf720c0
root@6121daf720c0:/#
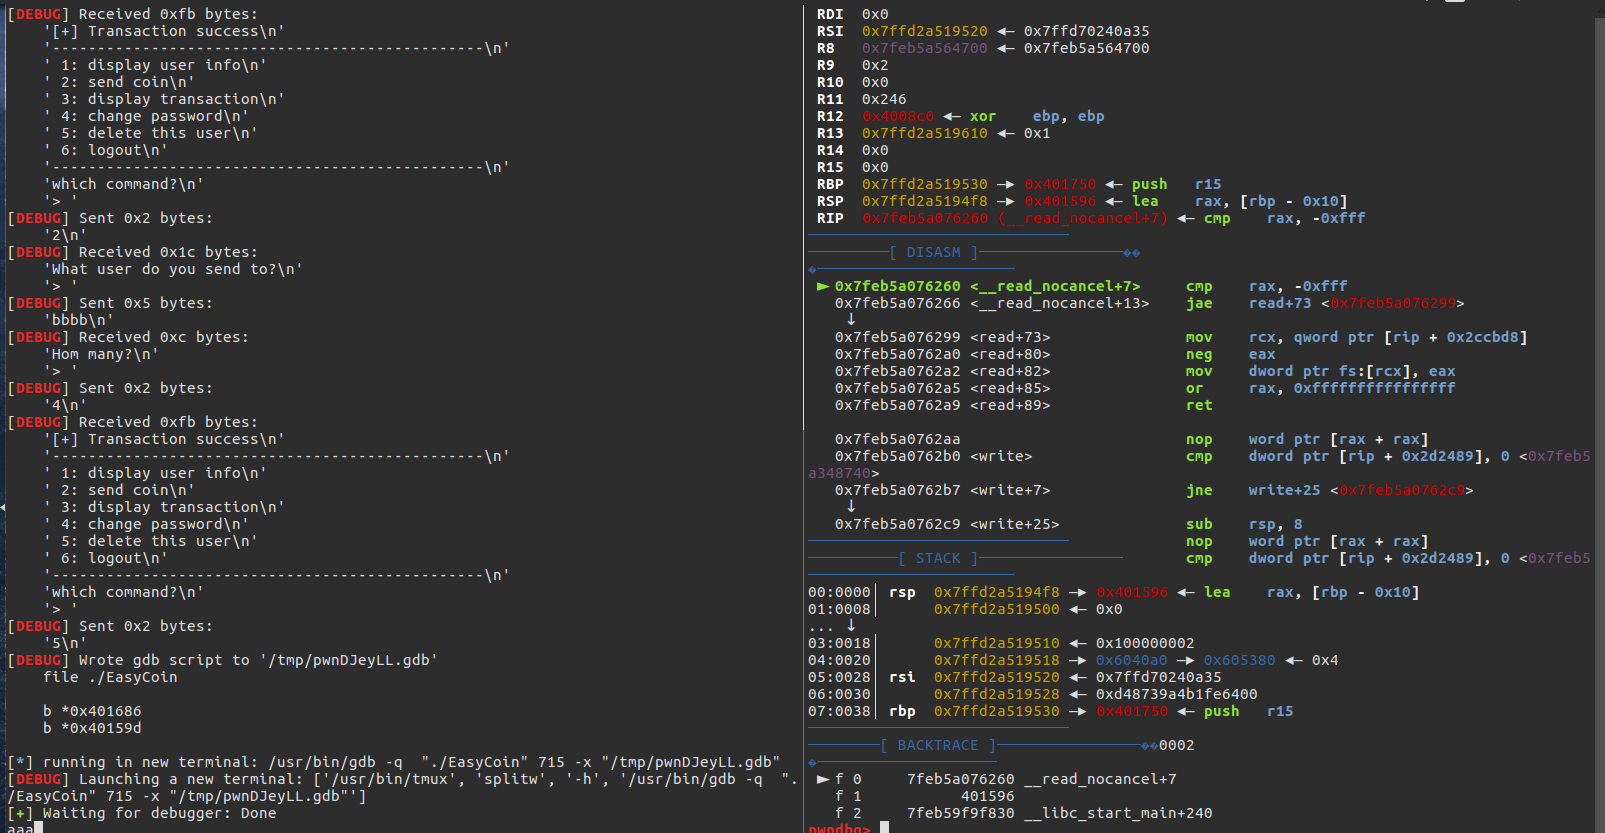
可以愉快的调试了:
附上阿里云中镜像的下载地址:
docker pull registry.cn-hangzhou.aliyuncs.com/e3pem/pwn-env-18.04
docker pull registry.cn-hangzhou.aliyuncs.com/e3pem/pwn-env-16.04
附上dockerhub中镜像的下载地址:
docker pull e3pem/pwn-env-18.04
docker pull e3pem/dockerpwn:v1